17. Additional external components
This chapter introduces a few additional external components that make it easier to accomplish some more advanced things with A-Frame.
This is by no means a complete listing of all relevant components.
Multi Source Textures
The Multi Source component for A-Frame allows us to texture specific sides of a <a-box>, instead of texturing all sides with the same image.
The component needs to be added through the following <script>:
<script src="https://cdn.rawgit.com/elbobo/aframe-multisrc-component/b6d23310/dist/0.3/aframe-multisrc-component.js"></script>In the <a-assets>, we list all the textures we want to use. In the following, I'm just listing the texture for one of the faces of the box:
<a-assets>
    <img
        id="head-front"
        src="https://raw.githubusercontent.com/jorgecardoso/aframe-course-resources/master/papercraft/character370/head-front.png"
    />
</a-assets>
Then in <a-box>, instead of using the src attribute to specify the texture, we use the multisrc attribute to define which side of the box we want to texture. For example, if we just wanted to texture the front face of the box:
<a-box position="0 1.6 -3"
multisrc="src4: #head-front"> </a-box>1600-multisrc-01
[new tab ]
[source ]
 Click to load.
Use keys 'w', 'a', 's', 'd' to move around.
Mouse to look around.
Notice that the front face is identified by src4. The Multi Source component assigns each face a different src# property as shown in Figure 1.
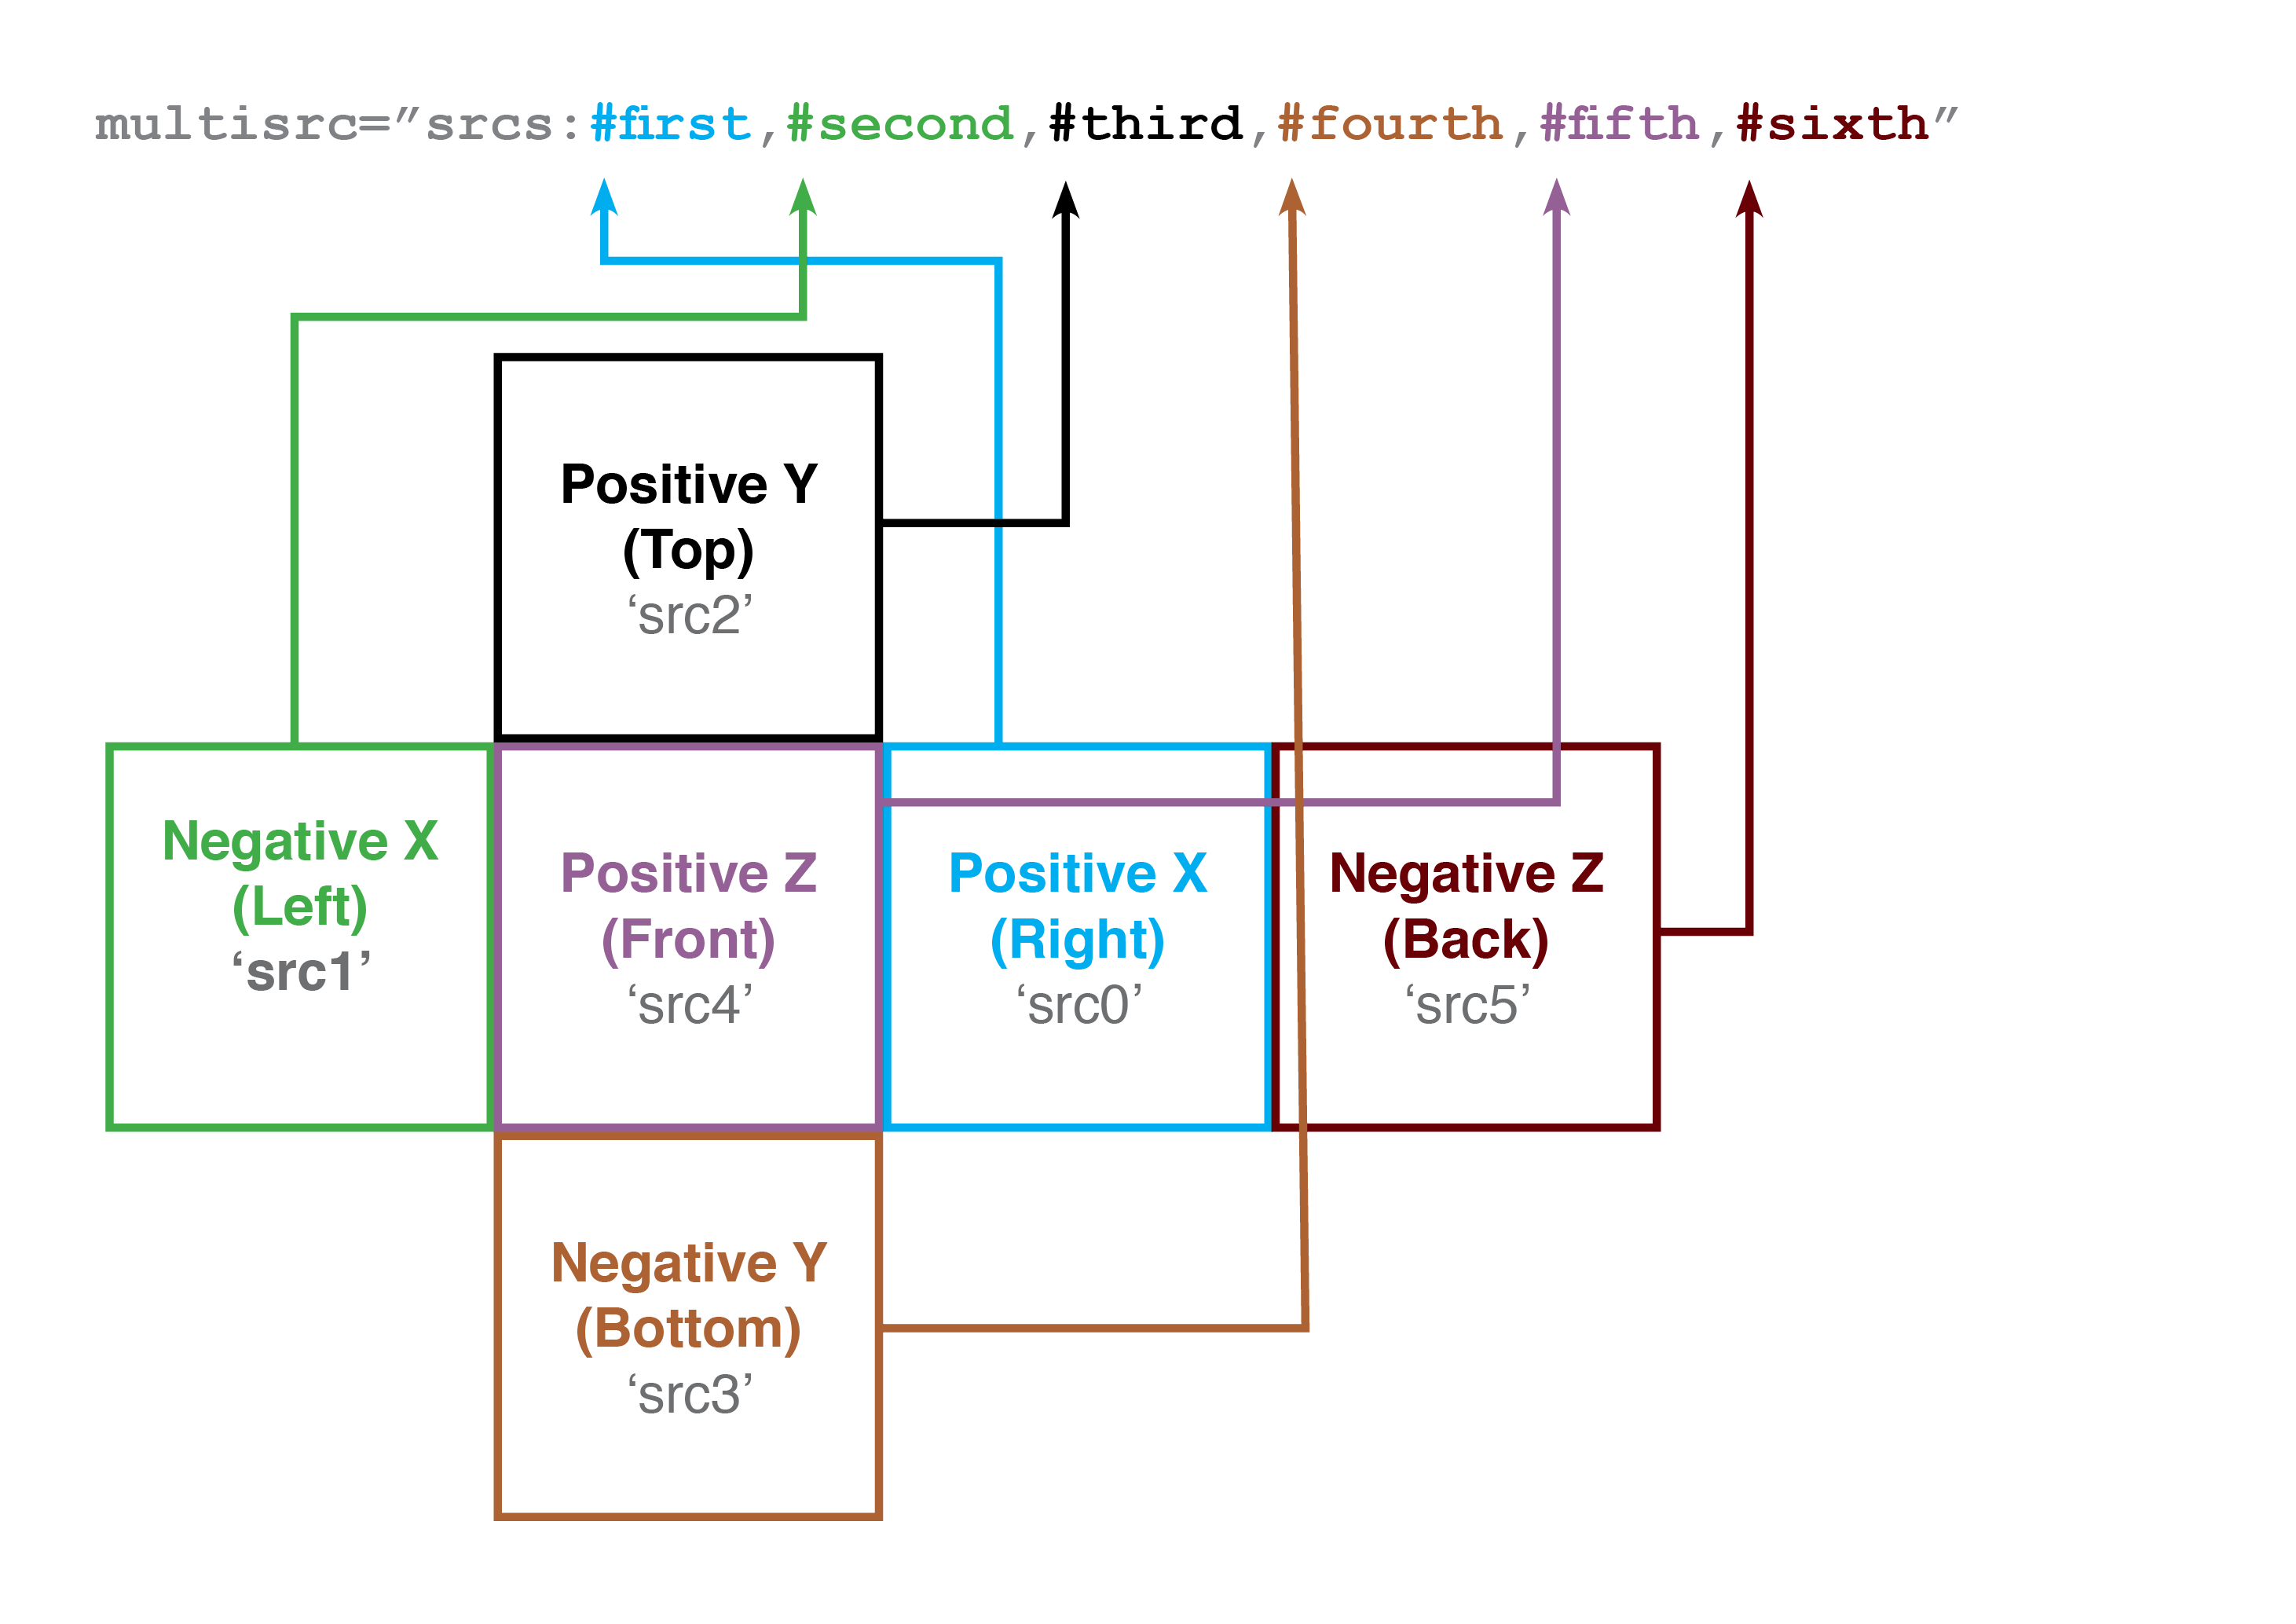
If you want to texture all six faces of the box, we can use the srcs property (instead of src0 through src5) and list the images in a specific order:
<a-box
    position="0 1.6 -3"
    multisrc="srcs:#head-right,#head-left,#head-top,#head-bottom,#head-front,#head-back"
>1600-multisrc-02-all
[new tab ]
[source ]
 Click to load.
Use keys 'w', 'a', 's', 'd' to move around.
Mouse to look around.
Multi Source component makes it easy to create, for example, boxy characters like the following Cubecraft one:
1600-multisrc-03-papercraft
[new tab ]
[source ]
 Click to load.
Use keys 'w', 'a', 's', 'd' to move around.
Mouse to look around.
Event Set
The Event Set component has already been used in previous examples, but let's look at it in a bit more detail.
We have already seen that we can "listen" to an event and make something change in the scene using the syntax event-set__click:
<a-box
    color="red"
    position="-0.5 1.6 -1"
    width="0.1"
    height="0.1"
    depth="0.1"
    event-set__click="color: green;"
></a-box>
In this example, if you click on the small red box to the left, it will change color to green:
1600-eventset-01
[new tab ]
[source ]
 Click to load.
Use keys 'w', 'a', 's', 'd' to move around.
Mouse to look around.
Targeting other entities
What if you want to click on the small red box but change the color of one of the large boxes behind? In this case, you need to use the _target property to specify which entity will change:
<a-box id="box1" position="-1.5 1.6 -3" color="yellow"></a-box>
<a-box id="box2" position="0 1.6 -3" color="yellow"></a-box>
<a-box id="box3" position="1.5 1.6 -3" color="yellow"></a-box>

<a-box
    color="red"
    position="-0.5 1.6 -1"
    width="0.1"
    height="0.1"
    depth="0.1"
    event-set__click="_target: #box1; color: green;"
></a-box>
In the above code snippet, the small red box "listens" to the click event but then triggers a color change on the #box1 box.
1600-eventset-02-target
[new tab ]
[source ]
 Click to load.
Use keys 'w', 'a', 's', 'd' to move around.
Mouse to look around.
Running multiple actions
What if you want to change the color of the box and change its height when users click on the small red box? In this case, you might be tempted to write two event-set__click:
<a-box
    color="red"
    position="-0.5 1.6 -1"
    width="0.1"
    height="0.1"
    depth="0.1"
    event-set__click="_target: #box1; color: green;"
    event-set__click="_target: #box1; height: 1.5;"
></a-box>
However, the above code does not work! It is illegal to have two attributes with the same exact name on an HTML element. The solution is to use the _event property to specify which event we want to "listen" to, and use different names on the right part of the `event-set__':
      <a-box
        color="red"
        position="-0.5 1.6 -1"
        width="0.1"
        height="0.1"
        depth="0.1"
        event-set__click1="_event: click; _target: #box1; color: green;"
        event-set__click2="_event: click; _target: #box1; height: 1.5;"
      ></a-box>
In the above code, we used click1 and click2, but you don't need to use numbers, you just need to make sure that the resulting names are different. You have just as well used foo and bar…
You should, however, use meaningful names to make it easier for you to understand your code.
1600-eventset-03-multiple
[new tab ]
[source ]
 Click to load.
Use keys 'w', 'a', 's', 'd' to move around.
Mouse to look around.
With the Event Set component, we can thus create richer interactive environments where users' actions trigger multiple changes in the scene!
1600-eventset-04-multiple
[new tab ]
[source ]
 Click to load.
Use keys 'w', 'a', 's', 'd' to move around.
Mouse to look around.
Proxy Events
There are many situations where the Event Set component is not enough. In example 1600-proxyevent-01 clicking on the small red or blue boxes triggers an animation on the large green box.
1600-proxyevent-01
[new tab ]
[source ]
 Click to load.
Use keys 'w', 'a', 's', 'd' to move around.
Mouse to look around.
We have already seen that we can start animations with events by using the startEvents property of the Animation component. However, the event needs to reach the entity to be animated. In this example, what we need is a way to forward the click event, which happens on the small box, to the large green box. This can be done with the Proxy Events.
The include script for Proxy Events is
<script src="https://unpkg.com/aframe-proxy-event-component/dist/aframe-proxy-event-component.min.js"></script>To use the Proxy Events component, we add the proxy-event attribute to the entity where we want to capture the event from. In the following snippet, we are capturing the click event -- notice the event: click property and forwarding it to the entity with the id #controlled (the large green box) -- the to property specifies the target. In the forwarding process, we also change the name of the event to clickred -- the as property allows us to change the name of the event.
<a-box
    color="red"
    position="-0.5 1.6 -1"
    width="0.1"
    height="0.1"
    depth="0.1"
    proxy-event="event: click; to: #controlled; as: clickred"
      ></a-box>
This means that a click on the red box will generate a clickred event on the large green box. So that we can now apply an animation to the box:
 <a-box
    id="controlled"
    position="0 2 -3"
    color="green"
    animation__red="property: rotation; to: 0 45 0; startEvents: clickred"
    animation__blue="property: rotation; to: 0 -45 0; startEvents: clickblue"
></a-box>
The Proxy Event component can, of course, also be used in conjunction with the Event Set component. It is particularly useful to change the names of standard events so that we can differentiate between click on different entities as in example 1600-proxyevent-02-togglebutton:
1600-proxyevent-02-togglebutton
[new tab ]
[source ]
 Click to load.
Use keys 'w', 'a', 's', 'd' to move around.
Mouse to look around.
Proxemics
The Proximity Sensor component, allows objects to be informed when another object is in proximity. By default, it tracks the proximity of the camera, i.e., the user, to an object.
The <script> to include is:
<script src="https://unpkg.com/aframe-proxemic-component@0.0.17/dist/aframe-proxemic-component.min.js"></script>The proximity trigger will send two events:
proximityenter: when the user has entered the proximity radius.proximityexit: when the user has left the proximity radius.
In the following example, the proximity sensor is defined with a radius of 2 (distance: 2). When the user enters that radius, the proximityenter event is triggered and it will in turn start the animation:
<a-box proximity-sensor="distance: 2" position="-1 1.6 -3" color="#ff0000"
      animation="property: position; dur: 2000; from: -1 1.6 -3; to: -1 1.6 -10;  startEvents: proximityenter;" >
</a-box>
Example 1600-proximity-01 demonstrates the use of the proximity sensor. If you approach the box to the left the proximity sensor will trigger an animation that makes the box go away. If you approach the box on the right, nothing will happen, until you walk away from it.
1600-proximity-01
[new tab ]
[source ]
 Click to load.
Use keys 'w', 'a', 's', 'd' to move around.
Mouse to look around.
Example 1200-animations-09-events-proximity shows how you can apply the proximity sensor to make doors open automatically!
1200-animations-09-events-proximity
[new tab ]
[source ]
 Click to load.
Use keys 'w', 'a', 's', 'd' to move around.
Mouse to look around.
Sprites and sprite sheets
1600-sprite-01
[new tab ]
[source ]
Use keys 'w', 'a', 's', 'd' to move around.
Mouse to look around.
1600-sprite-02-glow
[new tab ]
[source ]
Use keys 'w', 'a', 's', 'd' to move around.
Mouse to look around.
1600-sprite-03-animation
[new tab ]
[source ]
Use keys 'w', 'a', 's', 'd' to move around.
Mouse to look around.
Exercises
AdditionalComponents-01
Add the missing textures in example 1600-multisrc-03-papercraft (the assets are already set in the source code from the example).
AdditionalComponents-02
To the previous exercise, add small red box to the environment. Clicking on the red box should toggle the animation of the character.
References
- Cubecraft
- Event Set Component
- https://www.npmjs.com/package/aframe-event-set-component
<script src="https://unpkg.com/aframe-event-set-component@5.0.0/dist/aframe-event-set-component.min.js"></script>
- Multi Source Component
- https://github.com/elbobo/aframe-multisrc-component
<script src="https://cdn.rawgit.com/elbobo/aframe-multisrc-component/b6d23310/dist/0.3/aframe-multisrc-component.js"></script>
- Proxemics Component
- https://www.npmjs.com/package/aframe-proxemic-component
<script src="https://unpkg.com/aframe-proxemic-component@0.0.19/dist/aframe-proxemic-component.min.js"></script>
- Proxy Events Component
- https://www.npmjs.com/package/aframe-proxy-event-component
<script src="https://unpkg.com/aframe-proxy-event-component/dist/aframe-proxy-event-component.min.js"></script>